I’ve been working with a customer recently that required a special kind of disaster recovery capability for their shared storage pool (SSP) environment. The customer had implemented a private cloud solution in their existing POWER environment. The solution consisted of an IBM SmartCloud deployment with IBM Systems Director and VMControl managing the PowerVM deployment of virtual machines (AIX partitions) across the landscape.
The decision to use shared storage pools was driven by the fact that the customer was using SAN storage that could not be managed by VMControl. However, shared storage pool support was available with VMControl. This meant that the customer could continue using their non-IBM disk in their private cloud. The customer quickly noticed the many advantages that SSPs bring to a POWER cloud environment, such as very fast virtual machine deployment using snapshots and linked-clones.
Traditionally, the customer’s disaster (data) recovery process relied on SAN disk replication between its production and disaster recovery sites. In the event of a disaster the customer could recover a production system using a replicated copy of the SAN disks at the disaster recovery site. This also allowed the customer to perform regular disaster recovery tests. In these tests, the disaster recovery site is “fenced” from the real production network and SAN. The customer is then able to “bring up” a complete copy of any or all (replicated) production systems. Because these “copies” of production are fenced off from the real production environment the customer can undertake lengthy disaster recovery test programs without impacting the running production systems.
The customer had used this process for many, many years. They were happy with it and the flexibility it gave them. They wanted to continue using this process for the production SSP based systems.
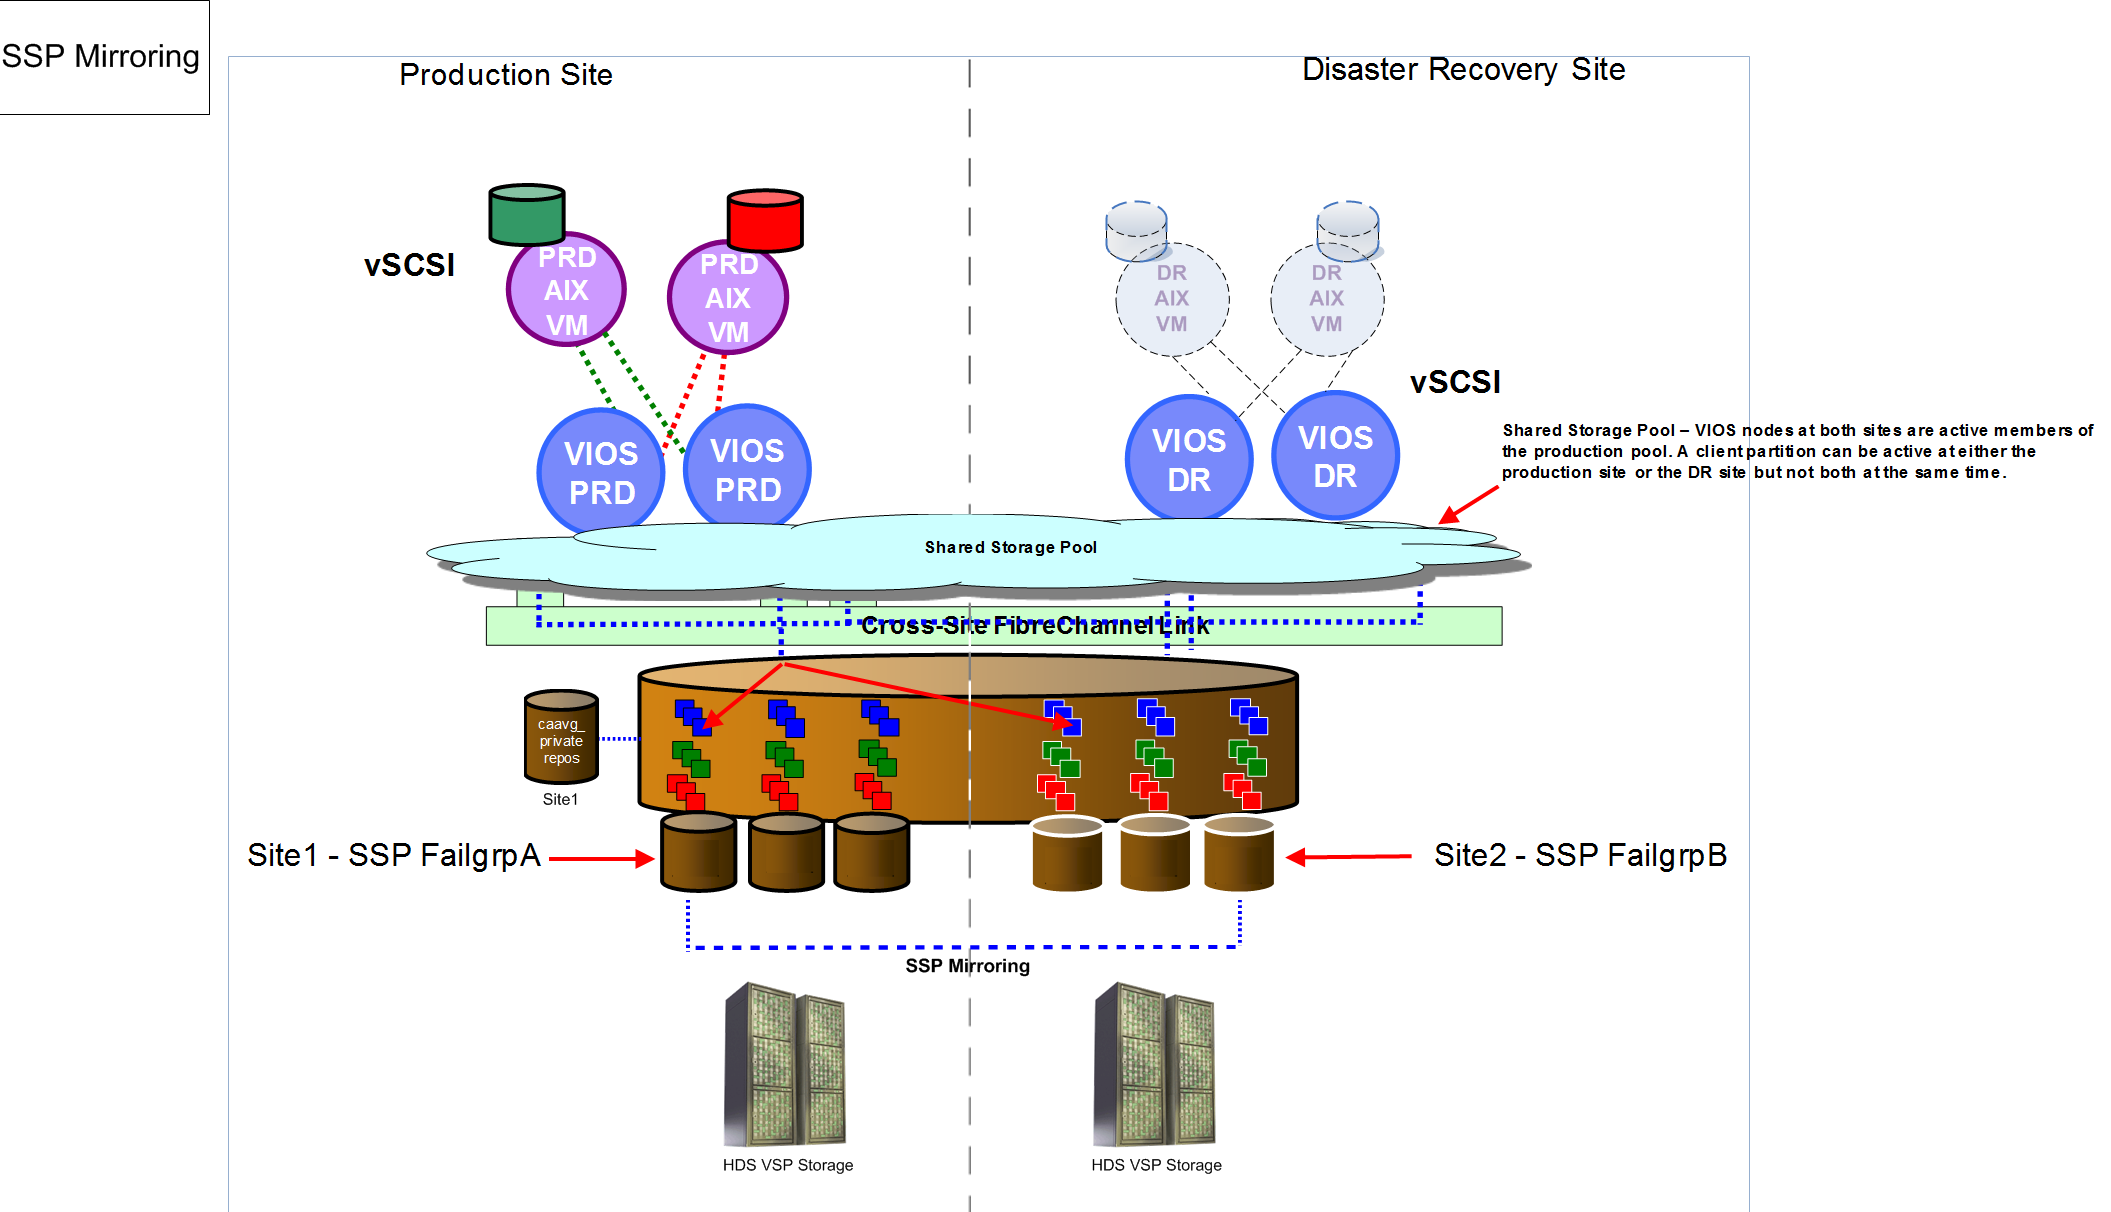
The customer wanted the ability to recover a (storage) replicated copy of their entire shared storage pool at their disaster recovery (DR) site. We discussed the use of SSP failure group mirroring to cater for their DR requirements of their production AIX partitions. The following diagram shows our initial proposal of SSP mirroring across the production and DR sites.
However, this did not meet their needs. They needed a way to recover their AIX production partitions in isolation to their real production environment. SSP mirroring would not provide them with this flexibility. Essentially the customer could not start a “copy” of any or all production partitions at the DR site. In a SSP failure group setup, the SSP spans both the production and DR sites (as shown in the previous diagram). Meaning the SSP is in production across both sites. SSP mirroring would protect the customer in the event that the production site was to fail; they could start their production systems at the DR site, however they could not start isolated copies of the production systems in the same SSP. This meant SSP mirroring would break their current DR processes and provide them with reduced capability when compared to their traditional DR method.
Prior to SSP mirroring, one of the major drawbacks of SSPs was the lack of resilience at the storage layer. We were not able to mirror the disks in the pool from one storage subsystem to another (either local or remote). Having a single disk storage subsystem in a shared storage pool was a rather large single point of failure (SPOF). Starting with VIOS 2.2.3.0, we were given the capability to mirror the disks in a SSP from one storage system to another. All of the mirroring was configured and managed from the VIOS in the SSP cluster. The VIO client partitions are not aware that their disks are ‘mirror protected’ in the SSP. There are no changes required in the client partitions as the SSP mirroring feature is completely transparent to them. This feature enabled SSPs to be considered ready for production use.
Some other considerations that we discussed with the customer regarding SSP mirroring were the fact that the disks in the SSP failure group need to be shared across all the SSP nodes at both the production and DR sites. This is not a viable option in the case of long distances between sites (more than 100KM apart). SSP mirroring uses synchronous writes. This means that any write that happens at the production site has to be written synchronously on the failure group disks at the DR site first then production. This will introduce a delay in completing I/O which will have an impact on performance. Fortunately the customer’s two sites were far less than 100KM apart, so this consideration did not apply to them, but I mention it simply to make others aware of this point.
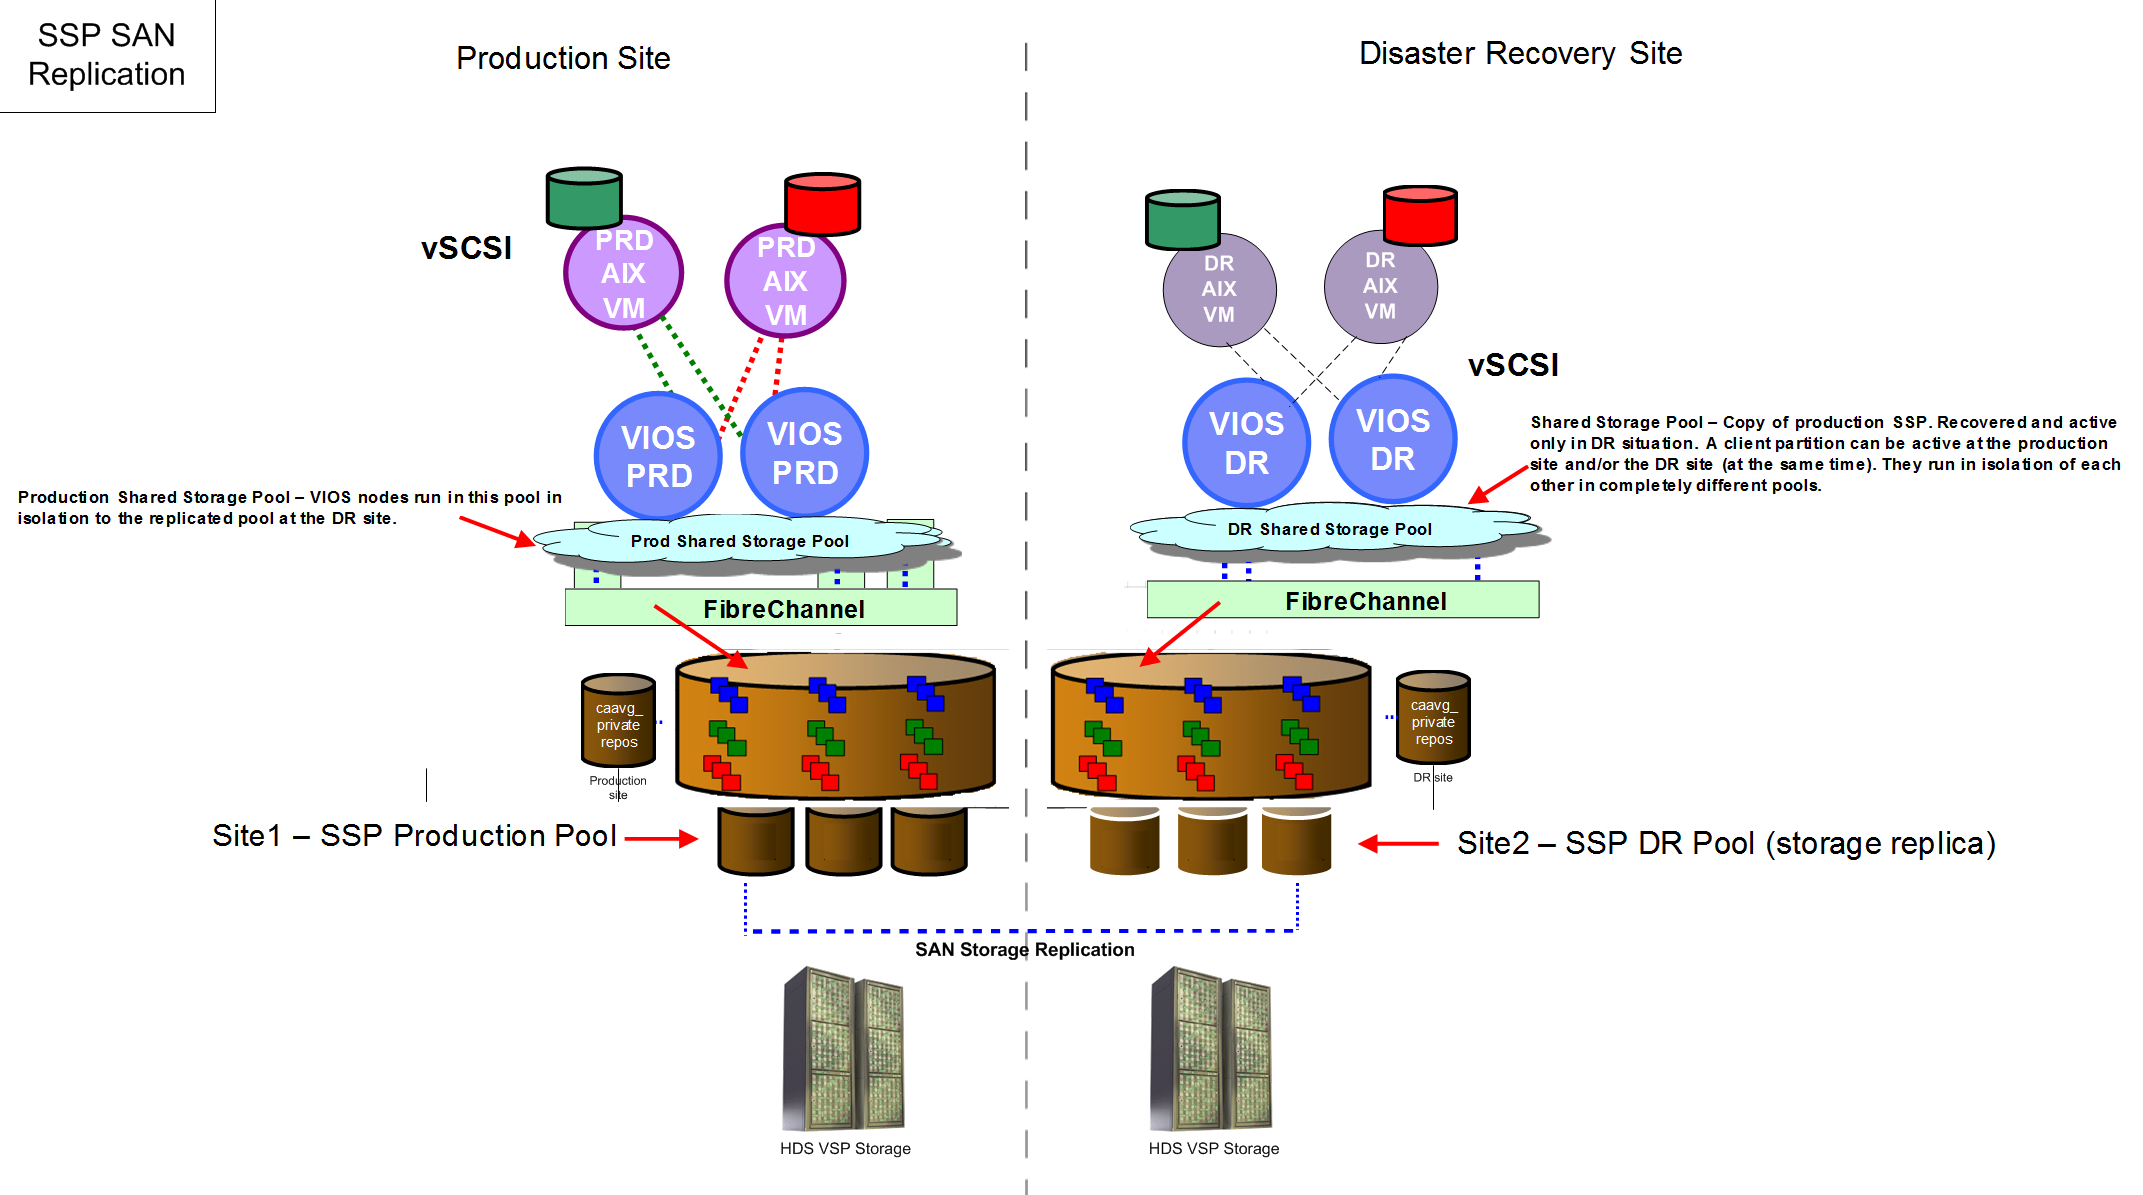
After much discussion with our SSP development team at IBM, we were able to provide the customer with an acceptable method of recovering their SSP environment at their DR site using a replica of the storage. What follows is a preview of this new recovery mechanism. This feature is not currently available as part of the standard SSP capability with VIOS 2.2.3.X. It is hoped that we will see this feature officially offered and supported at some stage in 2015. Of course, this is not an announcement and plans are always subject to change.
The following diagram provides a pictorial view of what the customer needed for DR with their SSP systems. As you can see in the diagram, there is a production and DR site. At the DR site there is a single SSP (with two VIOS in the cluster). Both the production and DR VIOS are in two separate shared storage pools.
The SSP development team provided a special ifix for the customer to install on their DR virtual I/O servers (VIOS). They also provided a script and procedure for the customer to follow. We successfully tested this procedure at the customers DR site. This was a huge success from the customer’s perspective as they were able to recover their entire production SSP in a few minutes. They could then selectively start/stop clones of the production AIX partitions at their DR site, without impacting the “real” production partitions at the production site. They were also able to continue using their existing storage replication method (as they had always done for all of their systems) in a DR situation. Not having to dramatically change their existing DR process and procedures was very important to the customer.
I’ll walk through the procedure now and share some insights (from my lab tests) as we go. It goes without saying, that before we started, the customer ensured that all the production SSP disks (LUNs) were being replicated to their DR site using their standard storage replication facility. The SSP repository disk was not replicated to the DR site. A new disk was used as the repos disk at the DR site.
The process (described in detail below) consists of a) taking a backup of the production SSP cluster configuration, b) running a “customise” script to modify the saved backup file to replace the production VIOS and hdisk names with the DR VIOS and hdisk names, c) restoring the modified VIOS backup on the DR VIOS at the DR site and finally d) verifying that the cluster has been recovered using the replicated storage at DR.
--
$ viosbr -backup -clustername mycluster -file sspbackup
$ oem_setup_env
# cd /home/padmin/backups
#ls
sspbackup.mycluster.tar.gz
We create a new file called nodelist in the backups directory. This file contains a list of the DR VIOS hostnames. These hostnames are used to create the replicated cluster at the remote site.
sspnode1.abc.com
sspnode2.abc.com
$ pv -list -fmt , | awk -F, '{print $7}'
3E213600A0B80006E24E60000AB8F4F570A440F1818 FAStT03IBMfcp
3E213600A0B80006E250600001CD94F570E730F1818 FAStT03IBMfcp
./customize_ssp_backup
./ifix/sspDR_1.140627.epkg.Z
$ updateios -install -dev /home/padmin/backups/ifix -accept
# ./customize_ssp_backup
Usage: customize_ssp_backup <backup_filename> <filename_with_hostnames> <filename_with_PoolDisks>
# ./customize_ssp_backup sspbackup.mycluster.tar.gz nodelist disklist
New configuration file created successfully: sspbackup_NEW.mycluster.tar.gz
$ lspv –free
$ viosbr -restore -clustername mycluster -repopvs hdisk5 -file /home/padmin/backups/sspbackup_NEW.mycluster.tar.gz -type cluster_remote
Backedup Devices that are unable to restore/change
==================================================
DEPLOYED or CHANGED devices:
============================
Dev name during BACKUP Dev name after RESTORE
---------------------- ----------------------
$ echo $?
0
We can now verify the new cluster has been configured and recovered correctly. We use the cluster and lu commands to check the cluster is up and that the logical units are available in the shared storage pool.
$ cluster -status -clustername mycluster
$ lu –list
The SSP is now ready for use at the DR site.
--
Before we tested this procedure in the customer’s environment, I tried it in my lab first. My lab had the following configuration:
My “production” SSP was configured with V7000 storage. I asked my storage administrator to create a copy (via flashcopy) of the nominated SSP disks from my 750 VIOS cluster. He then presented these new (flashcopied) LUNs to the “DR” VIOS on the PS701.
I then ran through the recovery steps (as outlined above). I started by taking a backup of the VIOS on the 750 using the viosbr command.
750vio1 (“production”)
-------------------------------
$ viosbr -backup -clustername VIOCLUSTER -file sspbackup
Backup of this node (750vio1) successful
I discovered that a SSP was already configured on my blade VIOS. I would need to delete the SSP cluster before I could recover the “production” cluster backup on this system. I obtained a list of the current disks in the SSP.
ps701-vios (“DR”)
-----------------------
$ pv -list
POOL_NAME: VIOSSP
TIER_NAME: SYSTEM
FG_NAME: Default
PV_NAME SIZE(MB) STATE UDID
hdisk2 51200 ONLINE 3321360050768019E027CC000000000000~
hdisk3 51200 ONLINE 3321360050768019E027CC000000000000~
I also took note of the existing repository disk.
$ lspv | grep caa
hdisk1 000a366a031ffa37 caavg_private active
I removed any existing client VSCSI mappings for SSP disk so that I could delete the logical units from the SSP and delete the cluster.
$ lu -remove -lu sspdisk1_lpar1
Logical unit sspdisk1_lpar1 with udid "27cf8eb804710aa5d5995c414b2fb329" is removed.
$ lu -list
$
Then I deleted the cluster and took note of the existing disks again.
$ cluster -delete -clustername VIOCLUSTER
Cluster VIOCLUSTER has been removed successfully.
$
$ lspv
NAME PVID VG STATUS
hdisk0 000a366a68640e58 rootvg active
hdisk1 000a366a031ffa37 None
hdisk2 none None
hdisk3 none None
hdisk4 none None
hdisk5 none None
hdisk6 none None
hdisk7 none None
hdisk8 none None
hdisk9 none None
hdisk10 none None
hdisk11 000a366a6b0d0d56 None
hdisk12 000a366a6b0d0d56 None
hdisk13 000a366a6b0d0d56 None
$
I also chose to “scrub” the existing repository disk using the cleandisk command. This would allow me to re-use this disk for my SSP recovery procedure.
$ cleandisk -r hdisk1
0967-112 Subsystem not configured.
rmcluster: This operation will scrub hdisk1, removing any volume groups and clearing cluster identifiers.
If another cluster is using this disk, that cluster will be destroyed.
Are you sure? (y/[n]) y
WARNING: Force continue.
ERROR: import caavg_private failed.
remove_cluster_repository: Force continue.
ERROR: Cannot varyonvg caavg_private. It does not exist.
ERROR: rc=1, remove caavg_private failed.
remove_cluster_repository: Force continue.
rmcluster: Successfully removed hdisk1.
I entered the oem_setup_env shell and ran cfgmgr to bring in the new (flashed) disks on the “DR” VIOS. Two new disks were configured. I would use these disks with the SSP recovery script and disklist file.
$ oem_setup_env
# cfgmgr
#
# lspv
hdisk0 000a366a68640e58 rootvg active
hdisk1 000a366a031ffa37 None
hdisk2 none None
hdisk3 none None
hdisk4 none None
hdisk5 none None
hdisk6 none None
hdisk7 none None
hdisk8 none None
hdisk9 none None
hdisk10 none None
hdisk11 000a366a6b0d0d56 None
hdisk12 000a366a6b0d0d56 None
hdisk13 000a366a6b0d0d56 None
hdisk14 none None <<<<<<<<
hdisk15 00f603cde9a7b15a None <<<<<<<<
#
I took note of the hdisks and the unique_ids and placed this information in a new file named disklist.
$ oem_setup_env
# odmget -qname=hdisk14 CuAt |grep -p unique_id |grep value |cut -d= -f2 | sed -e
's/"//g' | sed -e 's/ //g'
hdisk14 3321360050768019E027CC00000000000009D04214503IBMfcp
# odmget -qname=hdisk15 CuAt |grep -p unique_id |grep value |cut -d= -f2 | sed -e
's/"//g' | sed -e 's/ //g'
hdisk15 3321360050768019E027CC00000000000009E04214503IBMfcp
# cd backups
# cat disklist
3321360050768019E027CC00000000000009D04214503IBMfcp
3321360050768019E027CC00000000000009E04214503IBMfcp
#
I created the nodelist file, also in the backups directory.
# pwd
/home/padmin/backups
# cat nodelist
ps701-vios
I ensured that the necessary ifix was installed on my “DR” blade VIOS partition.
# emgr -l
ID STATE LABEL INSTALL TIME UPDATED BY ABSTRACT
=== ===== ========== ================= ========== ======================================
1 S sspDR_1 07/07/14 10:38:10 Fix to restore cluster on remote site
Then I ran the customise script to prepare the viosbr backup file for restoration on this “DR” VIOS.
# ./customize_ssp_backup sspbackup.tar.gz nodelist disklist
backupfile=sspbackup.tar.gz, hostfile=/home/padmin/backups/nodelist, pvfile=/home/padmin/backups/disklist
MTM=8406-71Y0310A366A, ID=1, nodefile=VIOCLUSTERMTM8406-71Y0310A366AP1.xml, clust=VIOCLUSTER, localnode=VIOCLUSTERMTM8406-71Y0310A366AP1.xml, newbackup=sspbackup_NEW.VIOCLUSTER.tar
cp: 0653-435 VIOCLUSTERMTM8406-71Y0310A366AP1.xml and VIOCLUSTERMTM8406-71Y0310A366AP1.xml are identical (not copied).
VIOCLUSTERDB/9fa498e4896611e38d72f603cdcd9c55/VIOCLUST.xml
/home/padmin/backups/temp/VIOCLUSTERDB/9fa498e4896611e38d72f603cdcd9c55/VIOCLUST.xml
/home/padmin/backups/temp/VIOCLUSTERDB/9fa498e4896611e38d72f603cdcd9c55/VIOCLUST.xml
CLUSTER CONF FILE=/home/padmin/backups/temp/VIOCLUSTERDB/9fa498e4896611e38d72f603cdcd9c55/VIOCLUST.xml
CLUSTER CONF FILE NEW=/home/padmin/backups/temp/VIOCLUSTERDB/9fa498e4896611e38d72f603cdcd9c55/VIOCLUST2.xml
New configuration file created successfully: sspbackup_NEW.VIOCLUSTER.tar.gz
#
I then restored the SSP from the customised viosbr backup file. I specified hdisk1 as the repos disk. The restore was successful (with an exit status of zero).
$ viosbr -restore -clustername VIOCLUSTER -repopvs hdisk1 -file /home/padmin/backups/sspbackup_NEW.VIOCLUSTER.tar.gz -type cluster_remote
"CLUSTER restore successful.
"Backedup Devices that are unable to restore/change
==================================================
DEPLOYED or CHANGED devices:
============================
Dev name during BACKUP Dev name after RESTORE
---------------------- ----------------------
$ echo $?
0
$
After the successful restore, I was able to display the cluster status and list the logical units in the recovered SSP.
$ cluster -list
CLUSTER_NAME: VIOCLUSTER
CLUSTER_ID: 9fa498e4896611e38d72f603cdcd9c55
$ lu -list
POOL_NAME: VIOSSP
TIER_NAME: SYSTEM
LU_NAME SIZE(MB) UNUSED(MB) UDID
sspdisk1_750lpar11 10240 7251 4f42b83c0ed7e826a4784b204b1c81ea
SNAPSHOTS
sspdisk1_750lpar11_snap1
$ cluster -status -clustername VIOCLUSTER
Cluster Name State
VIOCLUSTER OK
Node Name MTM Partition Num State Pool State
ps701-vios 8406-71Y0310A366A 1 OK OK
$
As expected, both of the “flashed” disks were now assigned to the recovered disk pool.
$ pv -list
POOL_NAME: VIOSSP
TIER_NAME: SYSTEM
FG_NAME: Default
PV_NAME SIZE(MB) STATE UDID
hdisk15 51200 ONLINE 3321360050768019E027CC000000000000~
hdisk14 51200 ONLINE 3321360050768019E027CC000000000000~
The existing hdisk1 had been successfully re-used for the repository disk of the “new” cluster.
$ lspv | grep caa
hdisk1 000a366a031ffa37 caavg_private active
$
The VIOS error report on the “DR” VIOS also confirmed that the SSP cluster was recovered and the services started correctly.
$ errlog
IDENTIFIER TIMESTAMP T C RESOURCE_NAME DESCRIPTION
228C1EBE 0707110114 I S POOL Cluster state change has occurred
228C1EBE 0707110014 I S POOL Cluster state change has occurred
EDFF8E9B 0707110014 I O StorageRM IBM.StorageRM daemon has started.
3B16518D 0707110014 I S ConfigRM The node is online in the domain indicat
4BDDFBCC 0707110014 I S ConfigRM The operational quorum state of the acti
AFA89905 0707110014 I O cthags Group Services daemon started
$
At this point I was able to map the LU to my VIO client partition and boot it on the PS701. AIX started without an issue and I now had a complete clone of my existing AIX partition (from the 750) running on my POWER blade.
$ lu –map –lu sspdisk1_750lpar11 –vadapter vhost4
Assigning logical unit 'sspdisk1_750lpar11' as a backing device.
VTD:vtscsi4
$ lsmap -vadapter vhost4
SVSA Physloc Client Partition ID
--------------- -------------------------------------------- ------------------
vhost4 U8406.71Y.10A366A-V1-C19 0x00000006
VTD vtopt1
Status Available
LUN 0x8200000000000000
Backing device
Physloc
Mirrored N/A
VTD vtscsi4
Status Available
LUN 0x8100000000000000
Backing device sspdisk1_750lpar11.4f42b83c0ed7e826a4784b204b1c81ea
Physloc
Mirrored N/A
Shared storage pools already provide some fantastic capabilities that are attractive to most POWER customers. Features such as SSP mirroring, snapshots and linked-clones provide some very powerful and flexible configurations that will accelerate virtual machine deployment and management on IBM Power Systems.
I believe the enhancement I’ve discussed here will prove very popular with many of our enterprise AIX and POWER customers. It will provide one more compelling reason for customers to consider shared storage pools in their environments, particularly for disaster recovery situations. There may even be the capability (in the future) to completely automate the entire procedure that I’ve outlined in this article. I hope that I can provide further updates on this capability in early 2015.
Reference material:
Mirroring a shared storage pool